
Tiny Shells and Making Waves
- Brittany Lambson
- Mar 3, 2025
- 6 min read

Updated: Apr 4, 2025

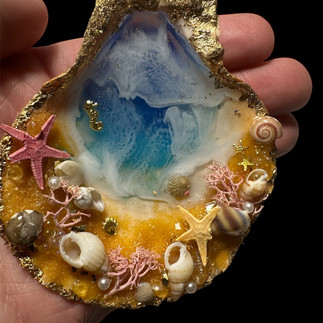
The main thing that drew me to learning resin art was the beautiful and realistic waves that can be created. I love watching waves seem to grow from nothing and froth at the shore, and the resin captures that feeling beautifully. I love the blue and green hues, the sparkle of the water and the sand, the beauty and colors of tropical fish, and the majesty of whales and sea turtles. Several years ago my husband and I were able to tag along on a trip to Hawaii with my Mom, and just recently we went on the adventure of a lifetime down to the Caribbean with my husband's family. Both trips had perfect moments that involved the ocean waves and beautiful white beaches. I love bringing back those memories whenever I create something beach or ocean themed. These shells started as a way to practice the different techniques to make the waves. They were so fun that I just kept making them!
This particular craft requires a tiny amount of lots of different supplies, and would be a good group activity (or way to use leftovers from other crafts.) It's also a good way to practice many different techniques.
Directions
You will need:
a covered work area, this one is messy!
Disposable gloves
Seashells (with a bit of a bowl shape, scallop or cockle work great)
UV resin and UV light (gel nail lights work great)
Blue, green, and white liquid pigment dyes
Yellow or tan craft sand.
Tiny/micro seashells
Gold or Silver foil flakes
Clear-drying craft glue (like ModPodge)
Several tiny mixing cups and popsicle sticks
small heat gun or blow dryer
A mix of the following
Iridescent shimmer flakes or glitter
Tiny pearls or white beads
Moss or fake coral
Small clear beads
Tiny ocean-themed charms or accents
First, make sure your shell is clean, and does not have cracks or holes. (If it does, use a thin coat of clear resin to seal it.) Pour about .5 oz of resin into each of four mixing cups. Use 1-2 drops of your pigment dye to color them a darker blue, a blue green, a lighter translucent blue, and an opaque white. Pour a TINY BIT of your first color into the deepest part of the shell to fill the "bottom" of the "ocean". (You will be building 2 or 3 more layers.) Use your lighter or heat gun to go over the surface and pop any bubbbles. Cure this layer, either with your UV light or by allowing it to sit overnight.
Once the first layer is cured, pour a small amount of the next color on top of the first layer, allowing the resin to come a bit further up the shell. Pop the bubbles, and cure this layer fully as well.
(If your shell is at the fullness you desire, you may skip the next step.)

Use your light/translucent blue to add a third layer, bringing the level of your ocean to just below where you want it to end. There should be a depth and visible ombre effect in the colors of the resin. Pop bubbles, and cure this layer.
The next part is the hardest part, but also what gives the shells their magic. There are dozens of videos you can watch to see how to create waves with resin, but most of them are for 2 part resin, not UV. The same general principles apply, however.
Add a clear layer on top of your "ocean" that goes just beyond the edge of the previous layer. DO NOT CURE this layer yet. Dip a toothpick or popsicle stick into the white resin, and draw a line across the length of the "shoreline", along the edge of the liquid resin. It should be about the width a crayon or marker would draw. Visually divide your shell into approximate thirds and add two more lines across the resin.
Starting at the shore, use your heat gun to blow the white lines into the clear resin behind them. Begin further back and slowly come closer to the shell until the white resin begins to move. Move slowly across the shoreline, blending the white out about a quarter inch into the clear resin. Hold the heat gun at a 30-45 degree angle to the surface of the resin. Once it begins blending out, the white will be blurred for a few moments, but it will soon solidify into a lacey pattern that looks just like real surf. This technique takes patience and practice, but is mesmerizingly beautiful when you get it down.
Move to each of the lines in your resin and blend them gently into the resin (blowing the lines backward by placing the gun at a shallow angle. If you blow straight from the top it will blend forward and backward, and loose the effect of the wave having an edge). If you blur the lines too much and they disappear, you can draw another white line of resin and try again. Once you are satisfied with the look, completely cure it with your UV light. Your ocean is done!
Now, we will decorate the shore. Leaving a small area empty at the edge of the water and along the edge of the shell, paint the "beach" area of your shell with a THIN layer of glue or resin. Shake your sand over this layer and allow it to dry (or cure it). Turn the shell upside down and shake or brush off any excess sand.

Now you get to release your creativity! Glue your micro shells around in the sand, adding bits of coral, glitter, beads, and pearls tucked up next to the shells. You can add embellishments on top of the water, or at the top of the shell. Have fun, make it beautiful! Small clusters look great on this project, and subtle sparkles or shimmers can add a lot. Feel free to make it unique, use whatever embellishments speak to you.

The last step is to add gold or silver edging of your shell. You can use a pain pen or glue leafing along the edge and rub it down to smooth it. This is a messy and time-consuming process using foil leafing, but stick with it. It will add a level of professionalism and a finished look that is worth it! If you have a tiny starfish, turtle, or other creature, you can add them on top of the foil at the edge.

Congratulations! Your seascape is complete! Keep practicing the lacing technique, you will learn to control it better each time. Each tiny ocean has it's own unique pattern and and waves, and I am captivated by them every time I make a new shell. I hope you love them as much as I do.


Child Development Ideas
This craft is definitely for older children or adults. The resin will ruin your clothes, and you should wear gloves, an apron, and masks any time you are working with it. It can be cleaned off your table with rubbing alcohol before it cures, but this craft can be very messy.
I would recommend ten or older, and with constant and close supervision. However, it is a TON of fun, and the girls I have done it with have had a blast! This is generally an opportunity to explore creativity, but you could use it to spark discussions and learning about ecosystems, ocean life, being environmentally responsible, and enjoying the natural beauties around you.
There are some complex chemical reactions happening (ultraviolet rays, photo initiators, and polymerization) that could lead to some fascinating science study.
This could also be a craft activity to accompany classic literary works like Island of the Blue Dolphins (O'dell), Treasure Island (Stevenson), The little Mermaid, (Anderson), The Pearl (Steinbeck), The Old Man and the Sea (Hemmingway), Moby Dick (Melville), or The Odyssey (Homer).
Gospel Connections
Each seashell in the ocean is unique and beautiful. Each of his creations is important and known by God. "Are not two sparrows sold for a farthing? And one of them shall not fall on the ground without your Father. But the very hairs of your head are all numbered. Fear ye not therefore, ye are of more value than many sparrows." (Matthew 10: 29-31) We spend time on our creations and crafts, and every one of them is different. Think about how you know and value the things you have made. How much more does our Father in Heaven know and value us, His children?
This week we read in D&C 18:10, "Remember the worth of souls is great in the sight of God." This is a well-known scripture that is part of a Doctrinal Mastery scripture. It is important to remember how much God loves us and how much we are worth. When we remember what we mean to Him, we are more willing and obedient, knowing we can trust Him and His will. When we remember what others mean to our Father, we treat them with greater respect and charity. When we think of how much each of His children is worth, we have a desire to share the gospel and serve them, helping bring them closer to God and our Savior. Each of us becomes a better person when we remember our own worth, and the worth of each of our brothers and sisters around us. Our differences become smaller, and our patience becomes greater. No matter who someone is, or where they are from, or what they believe, each of us is a precious son or daughter of our Father in Heaven and deserves to be treated as such. May each shell and fish remind us of our beauty and help us to be kind to both ourselves and those around us.


Comments