
Chocolate pretzels and Knowing the Sweet
- Brittany Lambson
- Jan 28, 2025
- 7 min read

Updated: Jan 30, 2025
Chocolate caramel pretzels are fancy, delicious, and surprisingly simple to make. I have made these several times as gifts, and when I did them for a fundraiser I sold them faster than I could make them! I like to customize them with themed sprinkles and colored sugar crystals, making them even more fun and decorative.
This is a wonderful activity to enjoy with people of any age or skill level. Creating 100 is just as simple as making 10, and the end result can be stored for up to three months if kept correctly. They are both beautiful and tasty, making them a perfect treat for Valentine's Day or Mother's Day.
Directions
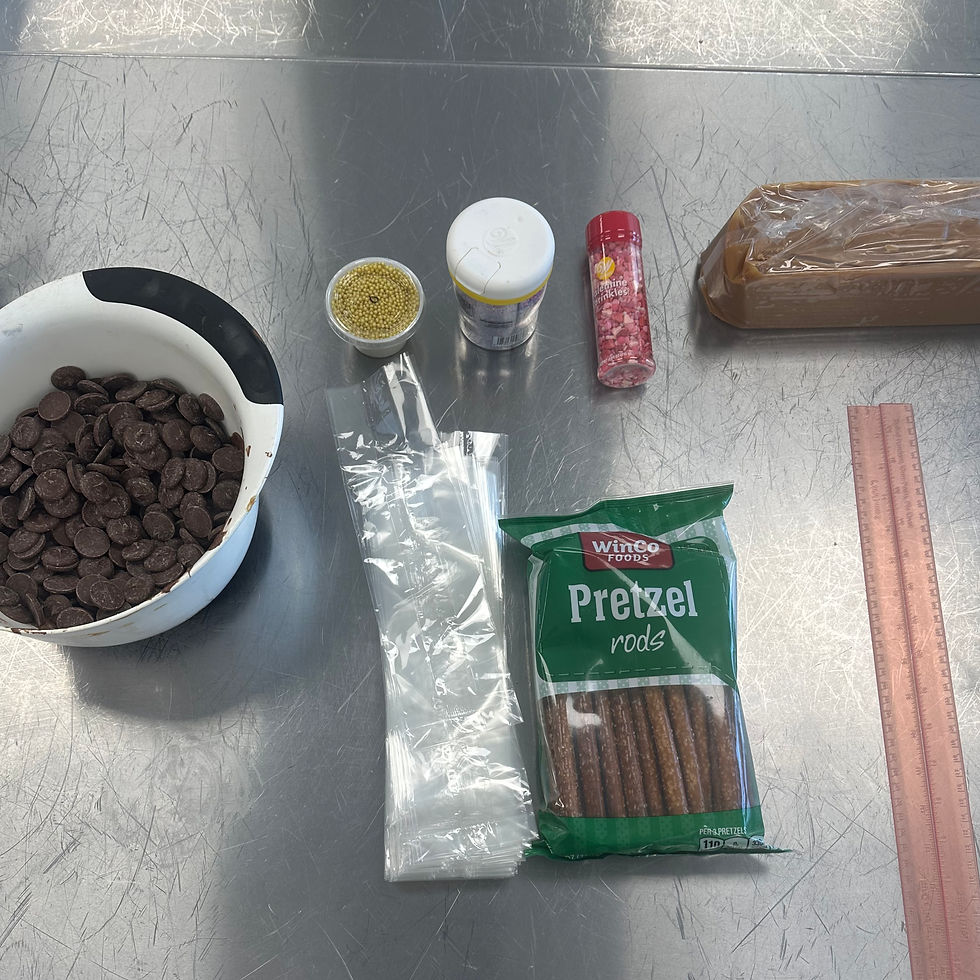
You will need:
Pretzel rods (grocery stores often have them for a good price, I get mine at Winco)
Milk Chocolate and a small amount of white chocolate (compound chocolate is best, apeels or other melting chocolate)
Caramel (I highly recommend a caramel loaf, like Peter's or Heavenly Caramels.)
Sprinkles and/or sugar crystals
Parchment paper
A rolling pin
A sharp knife, not serrated
Cellophane bags for packaging
Bowls, spoons, and spatulas.
Optional
Rolling pin thickness guides (a couple of rulers or other thin long sticks work just fine)
Food service gloves
Themed Sprinkles, edible decorating pearls (dragees), chopped nuts, or small candies for decorating.
To keep caramel smooth and manageable, cover your work area with parchment paper and minimize handling it with your hands. The caramel should be soft enough to leave an impression with a finger, yet firm enough to retain its shape. Cut off between 1-2 inches from the block to work with at a time. If softening is necessary, microwave the piece for 5-7 seconds, ensuring it does not become melted or shiny. Overheating will make the caramel too sticky to handle effectively with a rolling pin. If using a microwave, do not heat your chocolate at this point. If you are using the double boiler method, you can begin melting the chocolate.

Place your caramel piece on parchment paper and cover it with another sheet. Press the caramel until it's about 1/2 inch thick (I prefer using my hands for this). Next, set up your rolling pin guides (optional but useful). Keeping the caramel between the parchment sheets, roll it to an even thickness of 3/16 to 1/8 inch. After rolling, trim one edge to create a flat, smooth surface for working. You'll need a section about 6 inches long.
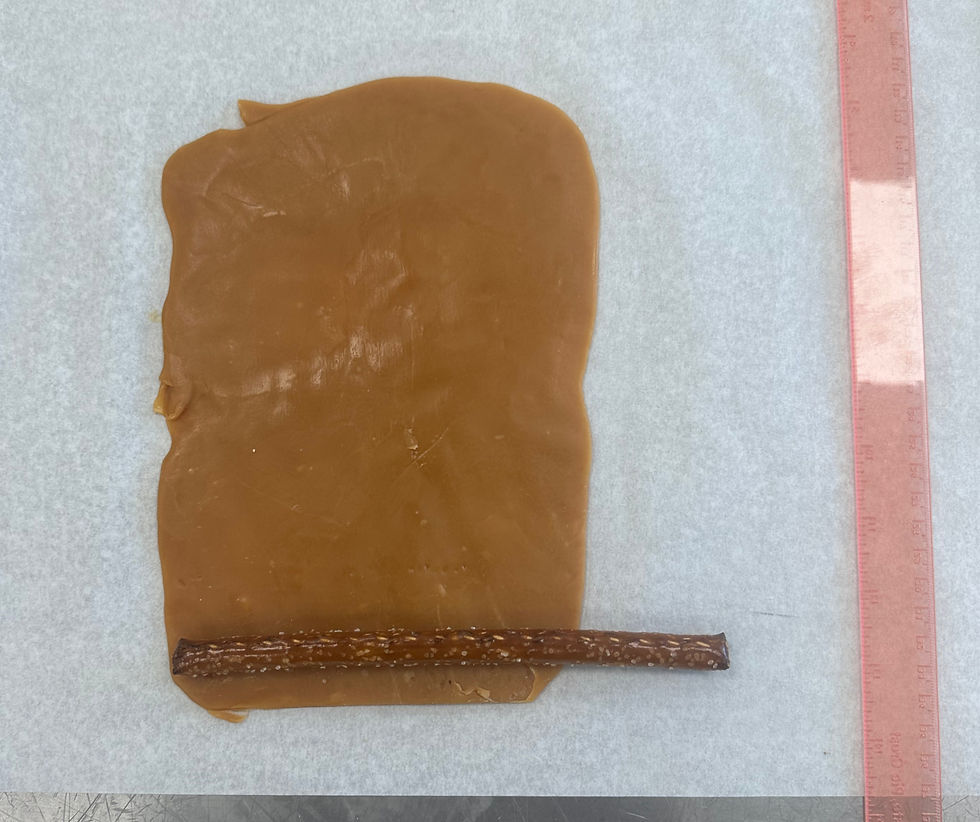
Place your rod on the caramel, leaving approximately 1.5 inches of pretzel extending beyond the caramel's edge. If needed, trim the caramel right above the rod's top, creating a large rectangular.
The following step is the most challenging. You must be gentle to prevent breaking the pretzel rod. Use your fingers to lightly hold the caramel strip against the pretzel, then carefully rotate the pretzel rod to wrap it in caramel. The rod can assist with measuring, but it's not crucial if the caramel is slightly over or under. Estimate where the ends will meet and cut the caramel strip accordingly. Gently press and smooth it until the rod is completely wrapped. Be careful, as the rod is fragile. It's fine to have a visible line as long as the caramel remains on the pretzel rod, as it will be covered in chocolate. Pinch the caramel closed at the top. You might need to remove some caramel to achieve a smooth and even shape.

Put that rod to the side (on either parchment paper or a baking mat) and wrap the next pretzel in caramel. If your rods break while wrapping, you can still use them to make mini rods, with the unbroken ends as the bottom of the rods.

Wrap all the rods you want to make before moving on to the chocolate coating. Stir the chocolate to ensure it is fully melted. (If you are microwaving the chocolate to melt it, only melt it 15 seconds at a time, and stir between. It won't seem like anything is happening at first, but DONT go longer than 15 seconds at a time. That will result in burned chocolate that turns lumpy and hard after a few minutes, no matter how hot it gets.)

Hold your rod in the bowl of melted chocolate, gripping at the base. Using a spoon or spatula, coat the caramel in chocolate while spinning the rod slowly. Leave a tiny amount of caramel peeking out the bottom of the chocolate to show the layers. Make the coating thick enough that you can’t see the caramel. Lift the rod out of the chocolate a few inches, allowing the excess chocolate to drip off for a moment. It doesn’t need to be perfectly smooth. Place the rod on the parchment paper. Let the chocolate set for about 30 seconds (I usually coat the next one at this point). Then you can begin decorating. I like to do the white chocolate drizzle before adding the sprinkles and such, but you can do in whatever order you prefer.


Dip a small spoon in the white chocolate, lift it out, then gently move it side to side while still over the bowl. This helps you get a feel for how runny or thick the chocolate is. That is important to get nice looking stripes. Once you feel confident, drizzle a thin line of chocolate stripes down the covered area of your pretzel. Once that is finished, you can place the rest of the toppings onto the rod.


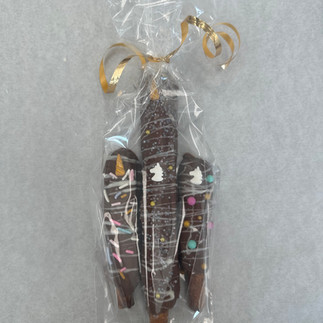
Then, let the rods fully dry and harden (this can be sped up by putting turn in the fridge). Once the chocolate is dull and matte in appearance, the rods are ready to package. Again, be careful. Not only do the rods break easily, but if you are too rough the sprinkles and chocolate may smear on the bad.
Close the bag with a sticker or a bow. And…tah -dah! Gourmet chocolate caramel pretzels, darling and delicious.
If placed in a cool, dark place, they will stay good for at least 7 days. If kept in the fridge, they are good for several weeks!

Learning Principles
Kids can help with these are many levels. Young children can add sprinkles or sugar crystals. Use this as a chance to reinforce basic math skills. Have them identify the shapes or colors of the decorations, and count the pretzels when you finish them. Be excited about the product when you finish, saying “We did it!” or “Wow! Look what we made!”. Avoid pointing out things that are wrong, let the child find satisfaction in what they have done.
School-age kids can help roll the caramel or help spoon the chocolate coating on. Allow them to decorate some as well. Be careful to NOT “fix” any of these that you feel look messy or strange, or gush about how wonderful each one is. Comment simply on something good about it, like “I like how the colors work together to make it fun.” or “That chocolate is really smooth, well done.” Then, ask the child what they like about it, or which ones look best and why. Let them develop their own opinion, and acknowledge it as a valid one.
Older children can help estimate the amount of chocolate needed or calculate how many bags of pretzels to get. Talk about science principles like why the chocolate melts and hardens, and at different temperatures than the caramel. Do division to see how many packages you can make with two or three rods per bag. And if possible, encourage the child to be the one to hand the package to the recipient, practicing in-person communication and cheerful service.
Making an attractive chocolate drizzle and a fancy chocolate treat takes practice, even for regular bakers. And the sprinkles always clump or spread strangely on at least one rod. Embrace the imperfections (possibly eat them yourself😋), look and realize how amazing the finished product is, and then acknowledge how amazing that YOU are.
Gospel Principles
The salty sweetness in these pretzels is part of what makes them so delicious. This time while making them, I thought of the contrast of salty and sweet, and it reminded me of these two scriptures about tasting the bitter and the sweet.
D&C 29:39
…for if they (Adam and Eve) never should have bitter they could not know the sweet—
Alma 36:20-21.
20. And oh, what joy, and what marvelous light I did behold; yea, my soul was filled with joy as exceeding as was my pain!
21. Yea, I say unto you, my son, that there could be nothing so exquisite and so bitter as were my pains. Yea, and again I say unto you, my son, that on the other hand, there can be nothing so exquisite and sweet as was my joy.
Opposition is an important principle in our religion. We believe that there are opposite forces like good and evil. We also believe that hardships and challenges help us to reach our potential, and we know everyone will experience them. We are subject to illness, temptation, weakness, and other types of opposition merely by being human. However, we also know that this is part of God’s plan. In the garden of Eden, experiencing pain and hardship allowed Adam and Eve to more fully appreciate the joys and blessings of life. Personally, my trials have made me able to see how incredibly blessed I am every single day. I am never more grateful to be feeling normal than after an extended illness. I felt so grateful to be able to gather at church after the COVID shutdown, which I had never even thought of as a privilege before that time.
Opposition is part of God’s plan for us, and it contributes to our learning, growth, and ability to experience joy. -Gospel study guide, under Fall of Adam and Eve
How do you view the opposition on your life? Do you see it as a curse, or as an opportunity? Does your struggle allow you to connect with and support another going through similar times now? How can you take your salty moments and use them to enhance the sweetness of life?
I know that God loves us dearly, and wants us to help us. He has given us a way to repent of our sins. He has given us a way to overcome our weaknesses. When we are willing to give our sins to the Lord, he can make us “as the salt of the Earth” and “sweet above all that is sweet, and pure beyond all that pure”.


Comments